Sunday, 23 June 2013

Clutch Pedal Lubrication

The clutch pedal on the Defender is quite heavy and it emits an annoying squeak on each press or release. To investigate the problem the spring on the pedal was removed to see if this was contributing to the problem.


This had no effect on the stiffness or the squeak, so the investigation moved to under the bonnet. To access the top of  the clutch pedal there is a small plate on the pedal box is located with 6 screws. 


Removing these screws reveals the master cylinder push-rod:

 
The full clutch pedal assembly diagram from the workshop manual is shown here: 


The application of some 3-in-One oil to the push rod attachement point (labelled 2 in the above picture) completely removed the squeak and greatly reduced the stiffness of the clutch pedal.


Saturday, 22 June 2013

Sound Deadening Phase 3 (Rear Tub)

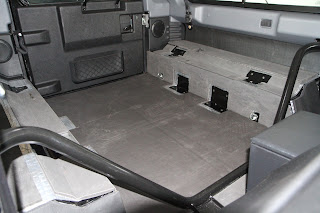
Today the rear tub of the Defender was treated to liberal amounts of Silent Coat Damping Mat.

To begin, the rear seats and carpet were all removed and the metal surfaces were cleaned down with methylated spirits.


The damping mat was then applied to as much of the floor and seat boxes as possible. Cut outs had to be made for the various seat brackets, cargo hooks and seat belt anchors. The side panels, up to the window surrounds were also covered. The areas behind the trim will get treated another day. 


The Defender came with some after market sound deadening from "Noise Killer". This was 8mm foam matting and was re-installed over the damping mat. Additionally the area between the seat boxes and window trims (which was previously bare metal) was covered in 6mm adhesive foam.  


Finally the seats and carpets were re-fitted.


Tuesday, 18 June 2013

Sound Deadening Phase 2 (Rear Door)

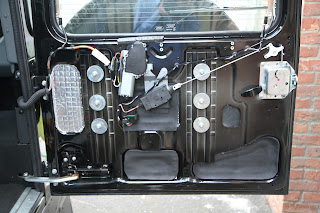
There wasn't much  access to the outer skin of the rear door, but damping mat was applied where possible.


6mm foam was then applied over the same areas.


When banging the door the lock actuator rattled, so it was packed out using a few layers of the 6mm foam.

Due to the complex shapes of and the rear door combined with the wiper and locking mechanisms, it wasn't practical to cover the door in the isolating foam. Instead the door card was lined with the 6mm Silent Coat foam.


Sunday, 16 June 2013

Sound deadening - stage 1 (Front Doors)

The Defender is noisy inside and at motorway speeds the levels can reach up to 80 decibels.
In order to improve the noise levels Silent Coat sound deadening and acoustic foam will be applied to many of the body panels.
Since the car already has a "Noise Killer" kit fitted, the areas that have not been covered will be treated first.
There is a noticeable area behind each front seat that is exposed and dampened. When stones thrown up by the tyres hit this part of the car, the bang is very loud.


Each section had 2 layers of sound dampening material applied followed by 2 layers of 6mm foam:


Next up, the front doors got some Silent Coat treatment.
The door cards and existing foam liner were removed and the door metal cleaned to remove any grease or dirt. Then the window regulator was unbolted to expose the outer skin of the door.


 The entire outer skin was covered in a layer of sound dampening material and then the flat areas had 6mm foam applied.


 The door was then re-assembled and dampening material was applied to the inner section.

At this point the door bottoms were treated to some Comma Wax n Seal to help prevent corrosion.
Finally, the full inner skin of each door was covered in 6 mm foam as a final noise barrier.


Wednesday, 5 June 2013

Wiper relay upgrade

As standard the Defender has 3 speed settings for the front window wipers:

  1. Continuous Slow
  2. Continuous Fast
  3. Intermittent (every 5 seconds)
In addition the wash wipe function wipes three times for every button press.

In light rain or road spray the intermittent wipe is often too slow and the Continuous slow setting can be too fast. To fix this, the standard (Red) wiper relay has been replaced with one from a Skoda (Black). It is very common to use  a VW relay, but the Skoda variant does pretty much the same job and is easier to obtain since it is scarcely mentioned on guides.

The photos below show the two relays and their position in the fuse box.


As a result the intermittent wipe time can now be programmed by turning the intermittent wipe on and then off after the length of time you want the wipe cycle to be. When you turn the intermittent wipe on again, it will assume the cycle time you set. I have tested settings from 1 second up to around 10 seconds.
In addition, the new relay also reduces the number of wipes from 3 to 2 when activating the wash/wipe for a short burst, but maintains the 3 wipe cycles when activated for a long burst.